
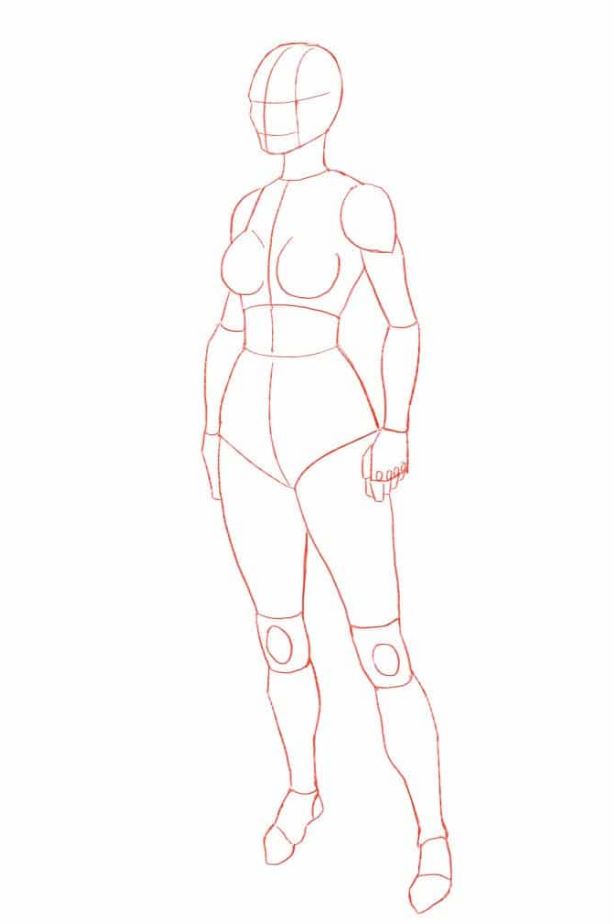
How To Draw The Girl’s Body. This tutorial will guide you in inventing the Girl body in 3/4. Many courses show you how to create a woman’s body from an entire front. While the 3/4 view is still practical, it makes your design less flat and rigid. It adds depth and three-dimensionality to the plan that would explain why it is the most common design view used by the artists of the idea. Also, check our Girl Base Drawing.
Step 1: Design the Bodice

We start the design of the Girl’s body from the bodice. I like to complete my techniques with the trunk, as this is the part that determines the position of the character’s body. With the torso in class, the remainder of the body intention fit in slightly. We will draw the bodice using curves and straight lines. A curved stripe is removed at the footing of the torso to separate the space between the abdomen and the chest. The right side of the viewer image, which is the next page, will be larger than the left. Because we are drawing a girl, I draw two ellipses on each side of the torso to outline the chest.
Step 2: Draw the Hips
The next part of the Girl’s body design is the hips. I draw the hips and the crotch to make it look like the girl is wearing lingerie. Then connect the hips and pull the abdominal area to leave room between the two regions. When drawing the torso, recognize the vertical line we drew from the channel’s floor to the bottom of the chest? We will extend this line to the groin to understand the three-dimensional design.
Step 3: Draw the Arms
With the torso and hips in place, we can draw the ends, starting with the arms. I like to remove the components at the shoulders, usually represented as inverted egg-shaped spheres. The upper part is slightly flattened while the inverted pointed end goes to the biceps. This shape resembles triangular deltoids and gives the design a more realistic body line.
The Biceps and Triceps
Due to the Girl’s pose, the right hand is completely hidden behind the body, leaving only a tiny part of the hand visible. The left hand is still apparent. The tubes were gradually narrow as we reached the elbow.
The Forearms
The left forearm is fully visible, while the right is slightly hidden behind the hips. However, there is still enough bar in the view. The narrow end is connected to the wrist aligned with the groin.
Hands
The right needle is not observable after the hips, so let’s focus on drawing the visual back of the left hand. We will use precise geometric figures to get the silhouette of our personality’s writing. We will draw a large five-sided irregular polygon for the back of the hand, while we will draw the fingers as small rectangles.
Step 4: Draw the Legs
With the arms apart, we will draw the other limbs of the Girl’s body: the legs.
The Thighs
Like biceps and triceps, we will use giant tubes about 2 to 3 times larger than the biceps to pull the femoral thighs. As for the length of the thighs, the distance between the crotch and the knees is two heads.
The Knees
Deficiencies in both knees indicate the shared border.
The Lower Leg
The lower part of the foot, between the knee and the ankle, consists of the calf and the tibia for the Girl’s pose. The outside has a concise curved line at the top and a longer curved line to the feet. We draw a curved line for the interior, one on top of the other, with the lower curved line going to the legs.
The Legs
We will draw the legs using geometric shapes such as trapezoids. I decided to remove the toes because our Girl will not wear shoes. I will use tiny circles and rectangles to represent the toes.
Step 5: Draw the Head
The next branch of our travels will be the prediction of our character. We will first draw a sphere to represent the skull and face. The head will rest on a neck depicted with an isosceles trapezoid. The strait connects the head with the rest of the body. Next, we draw two horizontal curved lines along the sphere.
Step 6: Draw the Finish Line Above The Dummy
Now that we are done with our mannequin, it is time to design the Girl body following the basic structure. With the proportions of the form, the body’s design becomes very easy. However, before creating the mannequin, we need to erase some parts. If you do not erase some regions, the dummy will affect your design.
The Face
There are two vertical lines on the mannequin head, the vertical line on the left, just below the first horizontally curved line where We will draw the nose. The eyes are marked on the first horizontal curved line, while the mouth intersects the second flat and the left vertical lines. We illustrate the eyes as two curves depicting the upper eyelids with a circle inside the daughter. Due to the 3/4 angle of the design, the eyes are not the exact size. Nearest to the observer, the left eye is wider than the right eye, which is further away.
Hands
Our Girl’s arms are not fully open or outstretched, so drawing the arms should not be difficult. Joints are the joints of the fingers that allow the fingers to move. So if you want a realistic design, start by making your ankles look alive.
The Legs
The feet are placed almost frontally to see all the toes well. The design of the toes is straightforward. Recognize to spend awareness to the measurement of your toes and make sure that each toe on the next toe is shorter and shorter than the previous toe.
The Dress
Next, we will outline our Girl’s underwear. We will draw a curved line just above the crotch to show that the Girl is wearing underwear. Then we pull two straps on the chest and connect them to the contour of the trunk so that it seems that the Girl is wearing a sports bra.
Step 7: Details

I want to give novice artists learning to design the human body to avoid developing the muscles entirely. The essence of the details is to make your design as realistic as possible. Do not draw the lines separating the muscle groups, but make the details as thin as possible. Just delete the insertion lines from the dummy, and you will complete your design.
Also, read Everything About SBA Loans for Independent Contractors.